Quality standards are getting tougher. Our customers are expecting more and we are even expecting more from our own companies. In these times, wire harness manufacturers are looking to expand business in their existing markets and for new markets. The following article will compare and contrast the current quality standards that are most commonly used today with main focus on the automotive sector. However, as quality standards get tighter, some of these standards may be adopted by other markets. I will also review proper measurement techniques and discuss some trends in crimp quality. Finally, I’m going to address methods to improve efficiency in quality data collection.
Rob Boyd, Product Manager CST, Schleuniger GmbH
It goes without saying that customers want top notch quality at the lowest possible price. All too often, they demand higher quality at the same or lower price. There are so many standards to adhere to and each customer might have different requirements depending on the regulations of his country. Keeping all of the specifications straight and understanding all of the differences are increasingly difficult. We’ve also experienced situations where customers had differences of opinion on what their own internal standards were. Larger companies with multiple plants, possibly in multiple countries are most susceptible to these kinds of challenges. Another consideration in these cases is language barriers. Different operators may take the same measurement differently and come out with different results. So who is correct? These issues make data collection more difficult and as we all know, data collection can be a very time-consuming and inefficient process if not done correctly. UL 486A-486B, IPC/WHMA-A-620, IPC/WHMA-A-620, SAE AS7928 (formerly MIL AS7928), USCAR-21 and VW 60330 which is the only process-oriented specification indicating how often testing should be done, are some of the most widely used standards. Each standard has their subtle differences. When you have some customers who want products made to the UL spec and others who want products made to SAE specs, how do you keep track of the differences?
Crimp height and width
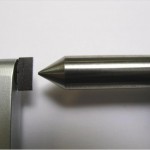
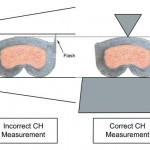
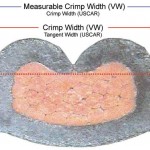
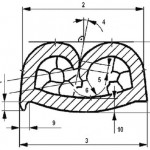
The only thing that all of the specifications have in common is that they all state that the terminal manufacturer’s specifications for crimp height and crimp width must be used with one exception: the A-620 specification makes crimp height measurement optional when pull testing is done. And only the VW specification states that 5 samples must be tested for each set-up. A set-up is when the wire, terminal, terminal reel, or applicator tooling is changed. The VW and A-620 specifications states that for crimp height measurements, a micrometer with a point and a blade must be used. The reason is to eliminate the possibility for the flash to affect the measurement. However, this method is not perfect either. If the measurement is not taken at the highest point of the crimp, the measurement may be incorrect. Crimp width is a bit of a challenge. Most customers don’t measure crimp width because it is a fixed dimension in the tooling. There are only 2 standards that address it, and both use different terminology. They state that there are two crimp widths; one can be measured on the crimped terminal and the other can not. The “Measurable Crimp Width” is measured at the widest point of the terminal. The „Crimp Width“ or “Tangent Width” is the non-measureable crimp width. It is a dimension on the crimp tool at the top just where the rolled part goes to the straight sides of the tool. Technically it is between the tangents of the radii of the crimp die. The measurable crimp width can be measured using standard callipers.
Tolerances
Tolerances are sometimes an issue as well. Some of the terminal manufacturers indicate tolerances for crimp height but some don’t. Some companies will use their own tolerances but some employees will apply them differently. Only few standards indicate tolerance specifications, but still they may vary. Most terminal manufacturers do not reference tolerances for crimp width either. This can be challenging because as we all know, tooling wears. So what tolerance is used? Most do not address it.
The crimp width tolerance is usually not listed in terminal specifications because it usually refers to the tangent width, which is the non-measurable crimp width. It is used as a tooling reference, not as a quality measurement parameter. Some customers use this for the measureable crimp width dimension but this isn’t technically correct. The sides of the crimp tooling are angled (i.e. 3° or 4°) which means the tangent width is less than the measurable crimp width. Therefore, how do customers verify that the crimp width conforms to the manufacturer’s specification if 1) the specification given can not be measured, 2) there is no dimension for the part of the terminal that can be measured and 3) there are no tolerances for the listed dimension? What are customers measuring and is it really correct?
Pull Test
Pull test is discussed in all of the specifications and it is mandatory in almost all of them. Pull test rates vary between specifications as well. Pull rate is the rate at which the wire and the terminal are pulled apart. It can be important because different values may be achieved if pull rates are not consistent. Usually, higher pull test values can be achieved with higher pull rates.
When performing a pull test, most customers do not remove the insulation crimp. However, some specifications require that the insulation crimp is opened up or rendered ineffective. One specification provides higher pull test values if the insulation crimp is left intact. USCAR is challenging to adhere to in that it specifies that the device used for testing must be capable of a tolerance of ±1% of the measurement value. Most pull test device tolerances are stated with respect to their maximum pulling force. According to USCAR, a 24 AWG wire has a minimum pull force of 40 N. A tolerance of ±1% of the measurement value would be 0.4 N. To comply with USCAR you could not use the standard 500 N pull test devices unless it had an accuracy of better than 0.09%. Most have accuracy of 0.5% or 0.25% of the maximum pull force, which is far from 0.09%. Stated another way, in order to achieve a tolerance of 0.4 N for the 24 AWG wire test, the pull tester could have a maximum pull force of 80 N if the device had an accuracy of 0.5%. If the device had an accuracy of 0.25% the maximum would be 160 N. The smallest wire that could be tested on a 500 N pull tester according to USCAR would be 12 AWG. Therefore, wire harness manufacturers that must comply to USCAR will either need pull test devices with extreme accuracy or they will need many devices for a complete range of wires. A wire range from 10 AWG to 22 AWG would require 5 different pull test devices.
Micrographs
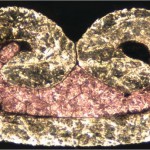
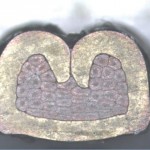
Even with all of these standards, 25% of all electrical failures in a car are due to bad crimps. Aside from simple mistakes made during the harness manufacturing process, terminals can go out of tolerance in the manufacturing process and frequently customers need to use terminals that are too large for the wire. USCAR recognizes that not all wires are the same. A 0.5mm² wire made to the SAE specification (0.508mm² minimum) is different from a 0.5mm² made to the ISO specification (0.4647mm² minimum). Because of issues such as this and the persistence of crimp quality problems, more and more companies, like VW in Europe and China, are integrating crimp cross section analysis into their production processes. Micrograph systems, or crimp cross sectioning equipment, were typically only seen where applicator tooling was manufactured or in the labs of the wire harness suppliers. They were large table units involving epoxies and acidic etching solutions. The systems costs are typically very high and the entire process is very time consuming. On the other hand, this type of equipment was the only way to get a clear picture of the inside of the crimp. New systems on the market are more suited for use in the production process because the crimp analysis process is much faster since there are fewer steps. Most systems use an electrolytic staining process rather than acid etching. Acids require special training, gloves and eye protection as well as special procurement and waste processes, since acids are considered to be hazardous materials. The solutions in the new systems have a Ph value equal to that of water so they are much safer to use and environmental-friendly and no special procurement and waste processes are required. Finally, the new systems are far less expensive. Therefore, getting a comprehensive analysis on the entire crimp is faster, easier and far less expensive. Only the USCAR and the VW specifications discuss the use of micrograph systems. The USCAR specification identifies them as only diagnostic tools for resolving issues. The VW specification mandates their use depending on wire size. More issues are seen in smaller wire sizes, so testing frequency is higher. Micrographs are also very useful when verifying terminal bend angles and cross area reduction. Both of which are very difficult to measure without a micrograph system. Quality standards are getting more rigid each year. Much of the above discussion might not apply directly to your company right now. However, we’ve seen in the past that standards that begin in one industry eventually migrate to others. Therefore, hopefully this gives you some advanced warning about what might be needed in the future. The preceding discussion covered a very small percentage of the respective specifications, but hopefully this has given you a better understanding of the different specifications.
productronica, B3.205
ZUSAMMENFASSUNG
Qualitätsstandards setzen sich von Jahr zu Jahr mehr durch, denn die Kunden erwarten immer mehr. Der Artikel vergleicht und beleuchtet die heute gebräuchlichsten Qualitätsstandards mit Fokus auf den Automotive-Sektor. Es werden sachgerechte Messtechniken vorgestellt und einige Trends in der Crimpqualität diskutiert.
Les standards de qualité s’imposent de plus en plus au fil des années, car les clients demandent toujours plus. L’article compare et éclaire les standards de qualité actuellement les plus usités, avec point de mire sur le secteur automobile. Des techniques de mesure appropriées sont présentées et certaines tendances de qualité de sertissage sont discutées.
Share:
