The amount of electrical and electronic functions in vehicles is growing continuously. This leads to an increasing complexity of the electric connectors in wire harnesses. This development is a great challenge for the quality test, which is subject to very tight demands due to security reasons. Innovative solutions are required especially in the details of adaption and contacting technologies.
Feinmetall, Herrenberg (Germany)
Apart from the typical short-circuit and wiring tests it is also required to check the correct position of contact elements in a connector. For these quality tests traditional adaption and contacting technologies are at a limit.
Traditional test methods
Up to now, the test of connectors was mainly based on position tests with step probes and push back tests with push back probes. The results of these tests have a certain tolerance width.
For a position test with a step probe a stepped tip is inserted into the connector housing to tap the test point. The length of the stepped tip is static and corresponds to the dimension from the lower edge of the connector up to the maximum distance to the contact element (plus overlap tolerance). It is only analyzed whether the contact element is in a correct position or not.
In a push back test a push back probe is inserted into the connector housing and pushed against the contact element with an increased force. The switch point of a push back probe is also static and shows the preset value at the contact element (plus overlap tolerance).
Also here we only get a yes/no result: contact element is present and properly locked into place or not present or displaced from the correct position or not properly locked into place. Pseudo defects still may occur.
New milestone for position tests
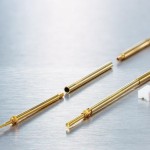
Today the test requirements are more complex. It is required to determine the exact position of the contact element within a connector to a fraction of a millimeter. A complete new, innovative solution enables a quantitative and very accurate measurement of the position test of contact elements: The Feinmetall Position Sensor System. A patent is pen- ding.
An innovative adjustable length measuring system was developed, offering a resolution of 5/100 mm at a stroke of up to 5 mm. This enables to determine the exact position of a contact element in the connector housing. The alignment of a Position Sensor System it not realized by adjusting of the calculated position in the test module as it is necessary using step probes or a push back probes, but very simple and flexible in the test software of the tester.
With the test software the exact position of a contact element in the connector can be quantitatively measured. Even smallest changes on the position of contact elements in the connector are detected and can be documented accordingly. The result if a test item is ok or not ok is only determined by the adjustment of the tolerance.
Functional principle
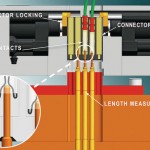
The measuring value of the length measuring probe changes proportional to the travel of the plunger. This value is recorded by the tester and analyzed by the test software. After a corresponding adjustment, this value offers a quantitative result of the probe travel and therefore also of the exact position of the DUT. If the recorded value is beyond the defined tolerances, the software will detect a failure meaning that the connector element is not at the correct position.
The spring contact probe with integrated sensor element has been developed to avoid pseudo defects. Pseudo defects are false detections of whether a test item is ok or not ok. For example a false test item may be detected as good – which causes great problems in the quality of the end product. By a more precise test method these false items can be identified correctly. This high precision is possible due to exact measurements and due to the possibility to detect tolerances of the module or fixture.
Capabilities of the length measuring system
Due to the modular design of the Feinmetall length measuring system PS732 even future capabilities are nearly unlimited. Thinkable is even a combination of twist-proof contact probes or push back probes offering a push back test and a length measuring test simultaneously.
Further applications for test fixtures:
- Detection of component sizes or lengths
- Precise detection of the depth of holes
- Surface inspection of injection molded items or other plastic pieces
- Detection of PCB bowing
- Combined electrical test and length measurement possible.
Conclusion
The Position Sensor System results in an all-time testing accuracy. This method enables the documentation of the exact position of each tested contact element. Different tip styles and a minimum contact distance of 1/10 of an inch allow applications for nearly all common contact types. Comfortable is the possibility to align the specified position via test software after mounting, and this with an accuracy of 5/100 mm. This solution is a milestone in connector testing and test fixture design. The new length measuring system really is a multifunctional test probe.
Share:


