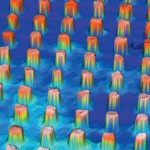
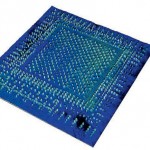
How can you check that 1000 to 4000 electronic contact bumps on a tiny area are all correctly aligned in a single plane? And how do you do it in the shortest possible time in order to ensure efficient production? 3D-Shape GmbH provides special inspection systems with the latest 3D image processing for complex fields of application. In doing so, it uses powerful camera technology from Mikrotron GmbH.
Fast, three-dimensional image processing systems are becoming more and more important in quality control for complex components, given their increasing superiority over tactile measuring systems in terms of speed, flexibility, precision and analysis options. As the saying goes, a picture says more than a thousand words. In the same way, image analysis is used for recording complex, multi-level relationships with numerous object parameters. Only a few years ago, the idea of high-precision measuring systems, accurate to just a few nanometres, providing 100 % product quality control on high-speed industrial assembly lines was inconceivable. The same was true for applications in the electronics, aerospace and automotive industries, as well as for high-precision microcomponent mould-making. The outstanding features of the EoSens camera make an important contribution towards effective image processing in this high-precision measuring environment.
Precise capturing of three-dimensional structures
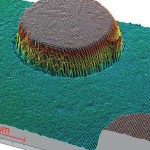
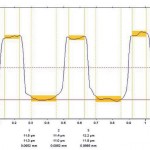
The long-established measuring techniques of interferometry combined with other methods are becoming increasingly significant in industrial production. The rapid development of high-performance processor technology, high-speed, high-resolution camera systems, precision optics and effective image processing software open up many new opportunities and applications. One of the most promising techniques is white light interferometry, which can measure the topography of both rough and smooth objects with the highest precision. Many white light interferometers operate on the principle of the Michelson interferometer. Put simply, it functions like this: The object to be measured and a reference mirror are illuminated by a coherent light source by splitting the light into two beams through a semitransparent mirror (beam splitter). The light reflected by the measured object and the reference mirror passes back through the beam splitter. The overlapping beams are captured as interference patterns on the camera’s image sensor. These brightness variations are evaluated by special software so that each pixel can be assigned a height value from which height profile of the surface can be generated. This method can achieve accuracy in the region of a few nanometres. If the procedure is performed layer-by-layer (height Z), the entire height of complex structures (such as contact pins) can be extremely precisely measured. With the Korad 3D range of sensors based on white light interferometry, 3D-Shape offers high-precision measuring solutions for many different industrial sectors. With measuring fields ranging from 0.24 x 0.18 mm to 50 x 50 mm, these compact measuring systems can be integrated in production lines to cover a wide range of applications. The accuracy that can be achieved directly depends on the required size of the measuring field, the lenses used and the camera resolution.
Therefore, one of the most important factors in these measuring systems is the power of the integrated camera. For flexible application, larger measuring fields are an advantage, but these reduce the accuracy that can be achieved. Therefore, the resolution and image quality of the camera are decisive factors in the performance of the Korad system. With many applications, it is necessary to capture the overall structure in several layers; this must be done within the very rapid cycle times of the production lines. Twice the measuring depth means twice the measuring time, so the problem is like squaring the circle. It requires a camera with megapixel resolution and high image frequencies that can quickly handle the resulting data rates. The images must be captured, transferred and evaluated in real time. Naturally, the crucial aspects of picture quality, such as contrast, noise response and light sensitivity, must also be taken into account.
Nothing but the best will do
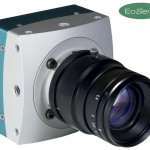
When 3D-Shape looked for the camera which best met all these image processing requirements, only a very few made the shortlist. Because the Erlangen-based company makes products which push the boundaries of physics, it needed a camera with the most up-to-date technology. A recommendation from a CMOS sensor manufacturer proved decisive. Ultimately, the EoSens camera from Mikrotron – according to the chief developers – was the only one that met all the requirements. Therefore, the decision was made to equip the Korad 3D measuring system with this camera. As well as offering a whole series of outstanding performance characteristics, the camera is also quite compact, which simplifies system integration. With a full image resolution of 1280 x 1024 pixels, the camera can provide up to 500 frames per second via the Basic/Full CameraLink high-performance interface (160/700 MB/s). This specification was just what 3D-Shape needed. For example, it was able to implement the inspection of bare printed circuit boards with a frame rate of 180 fps (frames per second) for one of its customers. However, rates of up to 500 fps are used in some applications. The outstanding 2500 ASA light sensitivity of the EoSens has proved an advantage because there is less need for expensive lighting systems and a wider brightness/contrast range is available for image processing. This light sensitivity is based, among other things, on the large 14 x 14 µm area of each individual pixel and the high pixel fill factor of 40 %.
Optimised lighting can also be activated. This adjusts the usually linear picture dynamics of the CMOS sensor to the non-linear dynamics of the human eye by means of two optional stages. By suppressing bright areas, it shows clear details everywhere, even when there are extreme differences between light and dark. This is a particular advantage for complex image processing.
Given the rapid cycle times of the Korad system, every factor that speeds up data processing is vital. These include the RoI (Region of Interest) function, where the site and position of the area can be freely defined. Thus, the recording field is adjusted to the task, and evaluation is speeded up by reducing the amount of data. At the same time, the frame rate can be greatly increased. The camera also features multiple RoI, where up to three different regions of interest in the overall image can be defined, although this is not used in current applications yet. However, it is already being considered for a number of interesting solutions.
To keep the accuracy of the object topographies generated by the Korad system within a narrow range, numerous imaging features must be combined to achieve an overall increase in performance. The EoSens Global Shutter freezes the full image and saves it in real time while the next image is being captured. This provides images of dynamic processes that are free of distortion and blurring. As well as the C-Mount for connecting the lens, there is also the option of the F-Mount, where the camera and the lens can be combined to form a permanently calibrated unit. This also ultimately helps improve the precision of analysis.
Conclusion
White light interferometry still offers plenty of potential for extremely accurate three-dimensional quality control within production lines. This includes monitoring of printed circuit boards, contact pins of ball-grid arrays and the cut edges of inserts. The many outstanding features and specifications of the EoSens camera, combined with the Korad system technology, allow custom three-dimensional measuring applications with microscopic accuracy to be implemented. The numerous benefits of these cameras made a decisive contribution towards the entire engineering of inspection and monitoring tasks.
EPP Europe 430
zusammenfassung
Die Weißlichtinterferometrie liefert ungenutzte Möglichkeiten präziser dreidimensionaler Qualitätskontrolle innerhalb von Fertigungslinien – beispielsweise die Kontrolle von Leiterplatten, die Kontaktstifte von Ball-Grid-Arrays oder auch die Schnittkante von Wendeschneidplatten. Die Kette von Leistungsmerkmalen und Spezifikationswerten der EoSens Kamera ermöglicht zusammen mit der Systemtechnologie von Korad die Realisierung kundenspezifischer 3D-Messaufgaben bis in den Mikrobereich.
L’interférométrie à lumière blanche offre des possibilités inégalées en termes de contrôle tridimensionnel précis de la qualité au sein de chaînes de fabrication, par exemple le contrôle de circuits imprimés, les broches de contact de matrices de billes (Ball Grid Arrays) ou encore l’arête de coupe de plaquettes amovibles. Les nombreuses caractéristiques de performances et valeurs de spécification de la caméra EoSens permettent, en association avec la technologie système de Korad, de réaliser des mesures en 3D spécifiques au client jusqu’à l’échelle microscopique.
L’interferometria a luce bianca offre possibilità finora non utilizzate per un controllo tridimensionale preciso della qualità delle linee di produzione – ad esempio il controllo dei circuiti stampati, delle spine di contatto dei Ball Grid Arrays o anche dei lati di taglio degli inserti. La serie di prestazioni e caratteristiche della fotocamera EoSens consente di realizzare insieme alla tecnologia di sistema di Korad delle misurazioni 3D su misura per i clienti, fino a livello micro.
Share:
