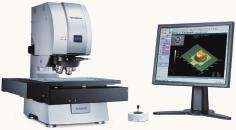
Olympus’ Lext is a confocal laser-scanning microscope for ultra-precise measurement and observation. No sample preparation is required as they can be placed directly on the microscope stage. Both 3D observation and high-precision measurements are possible in real time. With much higher resolution than conventional instruments but offering just as many different observation methods, the user can analyze quicker and more accurately. Lext is utilizing low wavelength technology of a 408nm laser in combination with confocal scanning to exceed resolution limits of optical systems. By special optics, minimizing the aberrations associated with short wavelength and maximizing the transmission, unequalled image quality and signal response have reportedly been achieved. The resolution power is enhanced by confocal scanning. With this technique, a surface is scanned point by point. At the detector side (photomultiplier), a special confocal pin hole blocks all rays that are reflected from out of focus planes. The photomultiplier measures the signal intensity at each point. 3D information of the surface is gathered by moving the objective in Z-direction. This system produces intensity maps of each acquired Z-layer which can be reconstructed to a 3D image. The advanced XY scanner makes the process faster and results more reproducible. The control of Z-axis scanning is extremely precise due to the use of a scale with 5nm increments. The result is a resolution which clearly recognizes individual lines spaced only 0.12µm apart and 0.01µm in height. All this with a remarkable reproducibility.
Lext is claimed setting standards in usability and measuring speed by a special operation concept. A 2-channel live display provides the opportunity to show a conventional colored microscope image and a confocal image in parallel. After the scan area had been defined by focusing on the top and on the bottom surface of the specimen, the scan process is running automatically. To allow the scan of surfaces with different reflection characteristics, such as the substrates and copper surface of a PCB, the instrument features an enhanced mode delivering clear images. All measurement functions are available, such as to analyze the shape of the surface, the height, distance, angle and volume. Lext allows measuring of roughness not only on one line but also on an area. Interpretation of results is getting much easier as the surface can be displayed in three dimensions, and surface, waviness and roughness can be separated. An optional motorized scanning stage enables automated image acquisition and measuring on several points of a specimen. Defects of metal corrosion that cannot be shown by monochrome pics are displayed in 3D color images, enabling more comprehensive analysis than is possible by SEM (scanning electron microscopy).
EPP EUROPE 439
Share:


